

How To Curl A Human Hair Wig
Curls are at the top of the wig game; they give any wig a ton of flavor and volume. That’s why everyone wants to know how to curl their unit like a pro! Whether you want big beachy waves or tightly defined ringlets, you’ve come to the right place. This article will shed some light on a couple of techniques you can use to curl your human hair wig. We’ll also dive into the pros and cons of both methods. By the end, you’ll know for sure which one is right for you.
How To Curl A Human Hair Wig With A Curling Iron
Curling irons are an excellent way to add some texture to your wig if you’re looking for a quick hairstyle that won’t take hours to complete. Your curls will last for about 3 to 5 days and can be customized to whatever size and shape you prefer with the proper tools and technique.
When it comes to picking a curling iron, the larger the barrel is, the looser your new curls will turn out. Alternatively, a curling iron with a small barrel will give you tight, defined ringlets.
This method can take as little as 30 minutes to as long as 1 hour, depending on the length and thickness of your wig. We’ll walk you through everything you need to know to safely curl a human hair wig with a curling iron below.
Get Your Supplies Ready
- Heat protectant
- Curling iron
- Wide-tooth comb
- Holding spray
Instructions for Curling a Wig with a Curling Iron
Step 1: Start with a clean, dry wig.
Step 2: Put your wig on your head or onto a wig stand.
Step 3: Turn on your curling iron and allow it to reach your preferred temperature.
- For fine hair, keep the temperature below 300 degrees.
- For thick and coarse hair, choose 300 through 400 degrees.
Step 4: Apply a heat protectant to the wig and comb it through to distribute it evenly.
Step 5: Separate a small section of hair and detangle it.
Step 6: Wrap the hair around your curling iron barrel and hold it for eight to ten seconds.
Step 7: Slowly pull the curling iron out and away from your hair. Disturbing the curls too soon will cause them to fall, so leave them alone until they fall to room temperature.
Step 8: Work in small sections and repeat the process on the entire wig. Switch up the angle of your curling iron to add some variety to your curls.
Step 9: Once you’re satisfied with the number of curls, apply a small amount of oil or serum to your fingertips and gently pull the curls apart. To create big voluminous waves, you can break them up with a brush or comb instead.
Step 10: Spray a light mist of holding spray onto the wig to keep your new style in place.
Pros and Cons Of Using A Curling Iron To Curl A Human Hair Wig
This section will provide a balanced look at the pros and cons of using a curling iron to curl your human hair wig. Soon, you’ll know if this is the technique you’ve been looking for.
Pros
- A curling iron gives you complete control over the shape and size of your curls.
- This method gives you instant results and is perfect if you’re short on time.
- The curls created with a curling iron tend to last longer than ones made with heatless methods.
Cons
- Hot tools can decrease the lifespan of your wig by damaging the hair fibers.
- This method requires some level of skill to achieve your desired look.
- Curling irons can lead to burns.
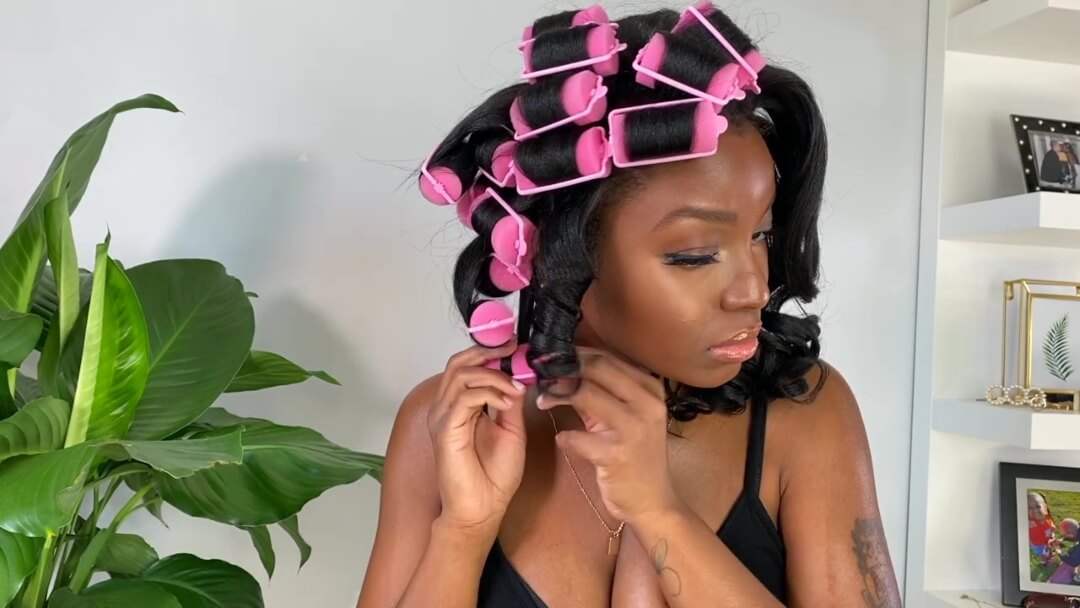
How To Curl A Human Hair Wig With Curling Rods / Rollers
Curling rods and rollers can give you perfectly defined curls and coils and are perfect for anyone trying to avoid hot tools. Curling rods are soft, bendable foam rods that can mold damp hair into a specific shape as it dries.
This method takes anywhere between 1 to 3 hours, depending on the length and thickness of your wig. It creates curls that last for three or more days with proper upkeep. Follow these simple steps to curl a human hair wig with curling rods.
Gather Your Materials
- Curling rods
- Spray bottle
- Hair oil
- Rattail comb
- Setting lotion or curl enhancer
- Blow-dryer
Instructions for Curling a Wig with Curling Rods or Rollers
Step 1: To get the best result, start with a clean, damp wig. If your wig is dry, spritz the hair with a spray bottle filled with water.
Step 2: Pick your curling rods. The larger the rod, the bigger and bouncier your curls will be.
Step 3: Separate a small section of hair and detangle it.
Step 4: Apply a small amount of curling or setting product to the hair.
Step 5: Wrap the damp hair around the length of your curling rod. Keep rolling your hair until the rod is sitting against the base of the wig.
Step 6: Bend the ends of the rod to keep it in place.
Step 7: Repeat the process on the rest of the wig.
Step 8: Wait overnight or until the wig is completely dry. The longer or thicker the hair is, the longer it will take to dry. Removing the rods too early will cause your curls to come out undefined and frizzy. If you want to speed up the drying process, use a blow-dryer on cool.
Step 9: Once the wig is dry, pick a rod and unlatch it. Unravel the hair in the opposite direction that you rolled it.
Step 10: Repeat step 9 until you’ve removed all of the rods.
Step 11: Put a small amount of oil on your fingertips and finger-style your new curls. The oil will help cut down on frizz and give your hair some added shine.
Step 12: Apply a light mist of hairspray to help your curls last.
Pros and Cons of Using Curling Rods to Curl A Human Hair Wig
Here are some of the pros and cons of using curling rods on a human hair wig. Use the information we’ve included in this section to help you determine if this technique is suitable for you.
Pros
- Curling rods are easy to use and beginner-friendly.
- You can let your wig set overnight for a style that’s ready to go when you wake up.
- This method is gentle on your wig and helps you avoid the damage of using hot tools.
Cons
- This method is more time-consuming because you have to wait for the hair to dry.
- You don’t have as much control over the shape and direction of your curls.
- You will need to select and purchase curling rods.
A Bit More References
In this video, April creates heatless holiday curls on her natural relaxed hair with sponge rollers. Even though she is not doing it on a wig, the technique is pretty much the same. Hope you enjoy it.
Remember
The better you take care of your wig, the longer it will last and the more beautiful it will look. Use high-quality products, avoid hot tools whenever possible, and treat your wig as gently as you would your natural hair. We hope this article has given you the information to do just that, so you can achieve the stunning curls and waves you deserve!


Leave a comment