

How to Dye a Wig Without Staining The Lace

Dyeing a wig is a popular way to add some flavor to your hair game. Unfortunately, the wig dyeing process can go bad in a hurry. One of the most common issues people have when dyeing wigs is stained lace. Stained lace can ruin your overall look and leave you with an unnatural result.
If you’re wondering how to dye a wig without staining the lace, you’ve come to the right place. In this article, we’ll tell you everything you need to know about wig dyeing along with how to avoid dyeing your lace.
What You Should Know
Before you jump into coloring your wig, it’s essential to know that dyeing your wig can cause irreversible damage. So, we here at XRS Beauty don’t recommend doing any at-home chemical treatments on your wig (dyeing, bleaching, perming, relaxing, etc.). Instead of DIYing your wig dye job, we suggest that you choose a pre-dyed wig or go to a professional wig colorist to do it for you.
But if you’re set on dyeing your wig at home, you can do so. Just be sure to read this article in its entirety to reduce your chances of a wig disaster.
Which Human Hair Wigs are Best for Dyeing?
When it comes to dyeing wigs, you want to first make sure that your wig is suitable for the dyeing process. Dyeing just any wig is a big mistake and can lead to costly mistakes. Here are a couple of tips to help you choose the right human hair wig for dyeing.
Choose Virgin Human Hair Wigs in a Natural Color. It is best to dye virgin wigs because they are unprocessed and can accept hair dye easily. We strongly advise against dyeing a jet black wig, as it can be difficult to get any color to show up on it.
Go For 613 Blonde Hair: You can dye your 613 blonde wig virtually any color you can think of. This is because it is the lightest and most common wig color. So, you won’t need to pre-lighten the hair to get your chosen dye to take.
Dyeing Tips to Keep in Mind
After determining that your wig is good for dyeing, you’re ready to begin the dyeing process. Here are some tips to keep in mind to avoid ruining your wig:
Don’t bleach your wig before dyeing it. Bleach is much harsher than dye and is very likely to damage your wig. Oftentimes, wigs go through some degree of processing before being sold, and that means that the hair could already be damaged.
Read the instructions on the dye. The instructions are super important, as they come directly from the manufacturer. If you don’t use the dye the way it was intended to be used, you probably won’t get the results you’re looking for.
Use the lowest developer that you can. If you will be dyeing dark hair with a permanent dye, don’t choose a high volume developer (40 or 50 volume). These developers are very strong and can instantly destroy the wig hair.
Continue reading to learn about the essential steps for dyeing a wig.
How to Choose Dye Color
Choosing your dye color can be a headache, but you don’t have to worry - we’re going to help you out in this section.
First of all, it’s important not to go for an outlandish color. If your wig is black, it’s not a good idea to go pastel pink. In order to achieve drastic color changes, you will need to pre-lighten the hair. This leads to a higher probability of hair damage.
Second, you should consider your own skin complexion. Your results may not look good if the new color clashes with your skin tone. Use the following tips to decide which hair dye shades might work best for you based on your skin tone:
Warm skin undertones: For skin with warm yellow or gold undertones, shades like platinum blonde, honey blonde, and chocolate all work very well.
Cool skin undertones: For skin has cool bluish or pinkish undertones, shades like golden brown, amber, and brown-black are a great complement.
Neutral skin undertones: For skin with neutral undertones, go for reds, blue-black, or dark brown.
Ultimately, the color you choose is totally up to you, and experimenting with vibrant, out-of-the-box colors is always fun. So, if you want to try a color that’s not universally considered a good fit for your skin tone, it’s not the end of the world. You may find that you absolutely love the way it turns out.
Tools and Products
You’ve chosen your hair dye, and the next step is to pick up the tools and products you’ll need for the dyeing process. Before you get started, grab the following products from your local beauty supply or online store:
- Hair Color: Choose from semi-permanent or permanent dye based on your personal preference. If you’re looking for a short-term change, go with semi-permanent dye. It will fade gradually every time you wash your wig. For a long-term change, a permanent hair dye is a better choice. The longer and thicker your wig is, the more dye you’ll need.
- Developer (for permanent hair dye only): Semi-permanent dye should not be used with developer. If you’re trying to lift your wig by 1 to 2 levels, choose a 20 volume developer. For 2 - 3 levels, a 30 volume developer is best. We don’t recommend using a developer that’s more potent than 30 volume. 40 and 50 volume developers are super harsh and will compromise the quality of your wig.
- Tinting Brush
- Long spoon (watercolor method only)
- An old towel
- Comb
- Gloves
- Wig mannequin head
- T-Pins
- Vaseline (Optional: For protecting lace)
- Gel and Got2b Glued Spray (Optional: For protecting lace)
- Plastic bag (Optional)
- Plastic tub (Watercolor method only)
- Toothbrush (Optional)
- Newspaper (Optional)
- Microfiber towel
Prepare Your Wig for Dyeing
Prepping your wig for the dyeing process is a three-step procedure. You’ll need to wash, dry, and detangle the wig. Here’s how to do it:
Wash your wig how you usually would. Do not condition the wig - doing so can create a barrier between the hair and the dye, negatively affecting your results.
Dry your wig thoroughly. Air drying is the most gentle way to dry your wig. However, if you’re short on time, you can use a blow dryer. We recommend drying it using the “cool” setting.
Detangle your wig. Detangling your wig is as simple as brushing it from ends to roots. To avoid pulling on the roots, hold them taut with one hand as you brush the mid-lengths and ends with the other. Once all of the tangles are gone, you’re ready to move to the next step.
Dye Your Wig Step by Step
There are several wig dyeing techniques to choose from, and each of them has its own appeal. In this section, we’re going to take you through each dyeing step so you can achieve the most beautiful results without damaging your wig or staining your lace.
Note on bleach: If you’re going from super dark to light, which we don’t recommend, you may need to bleach your wig before going through the rest of the steps. If that’s the case, we recommend enlisting the help of a professional colorist.
Step 1: Protect the Lace
If you don’t want to stain the wig’s lace, you have a couple of protective options to choose from. No matter what type of dye you use, you don’t want to skip this step.
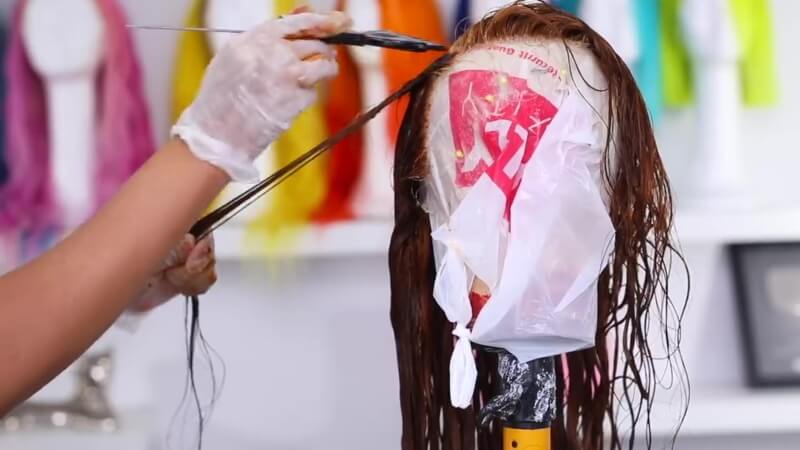
Option 1: Vaseline method (Best for watercolor dyeing)
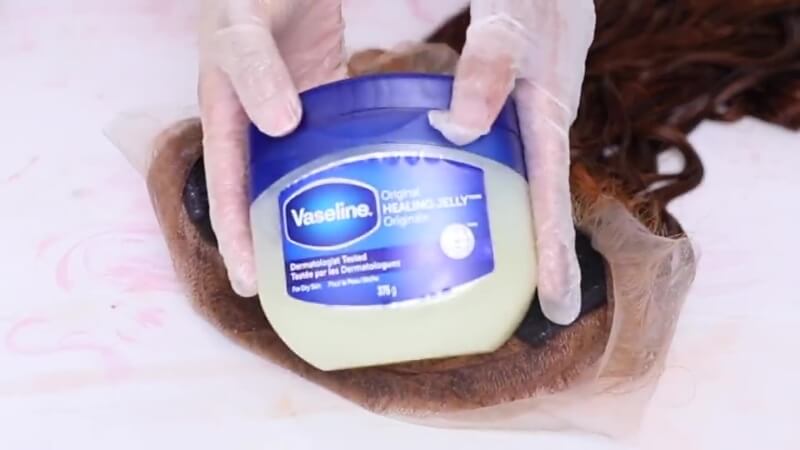
- Tie a plastic bag around your mannequin head to protect it from the Vaseline.
- Turn your wig inside out and place it on the mannequin head.
- Use T-Pins to secure the wig to the mannequin head.
- Spread some Vaseline onto the lace and press it in. All you need is a thin layer.
- Don’t apply the Vaseline to the fabric portions of the wig.
- Proceed with the dyeing process as outlined below.
Option 2: Got2b Spray and Gel Method (Best for Brush Dye Applications)
- Turn your wig inside out and secure it to your mannequin head.
- Apply some gel to the lace. Ensure that all of the lace is covered.
- Air dry or blow-dry the lace until it’s 100% dry.
- Spray got2b glued spray onto the lace and then allow that to dry.
- Proceed with the appropriate dyeing steps.
Note: Either of these methods will create a barrier against the dye so that you don’t end up with stained lace. In some cases, you may still get very slight staining. However, these methods will drastically reduce your chances of getting noticeable lace stains.
Step 2: Mix Up the Dye
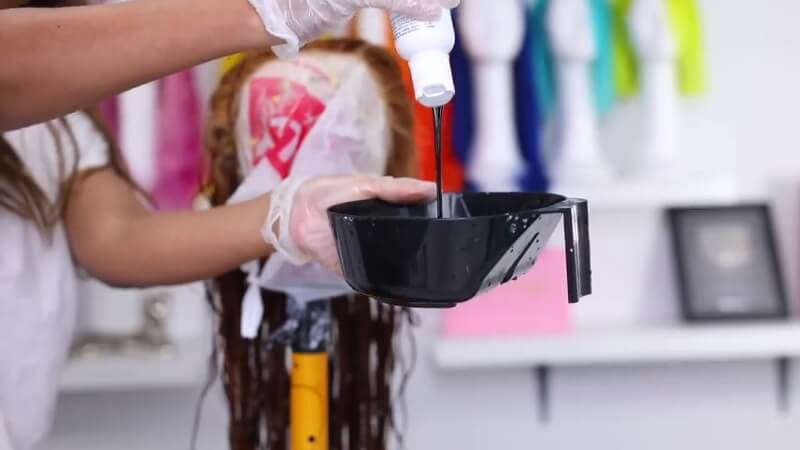
For semi-permanent hair dye, you won’t need to mix the dye with developer or any other products. But for permanent dye, you’ll need to mix the color with a developer (10, 20, or 30) according to the instructions on the dye packaging. The general rule for permanent dye is to mix 1 part hair dye with 1 part developer and stir with the tinting brush until there are no lumps. If the instructions on your hair dye are different, follow them. Be sure to wear gloves during this step.
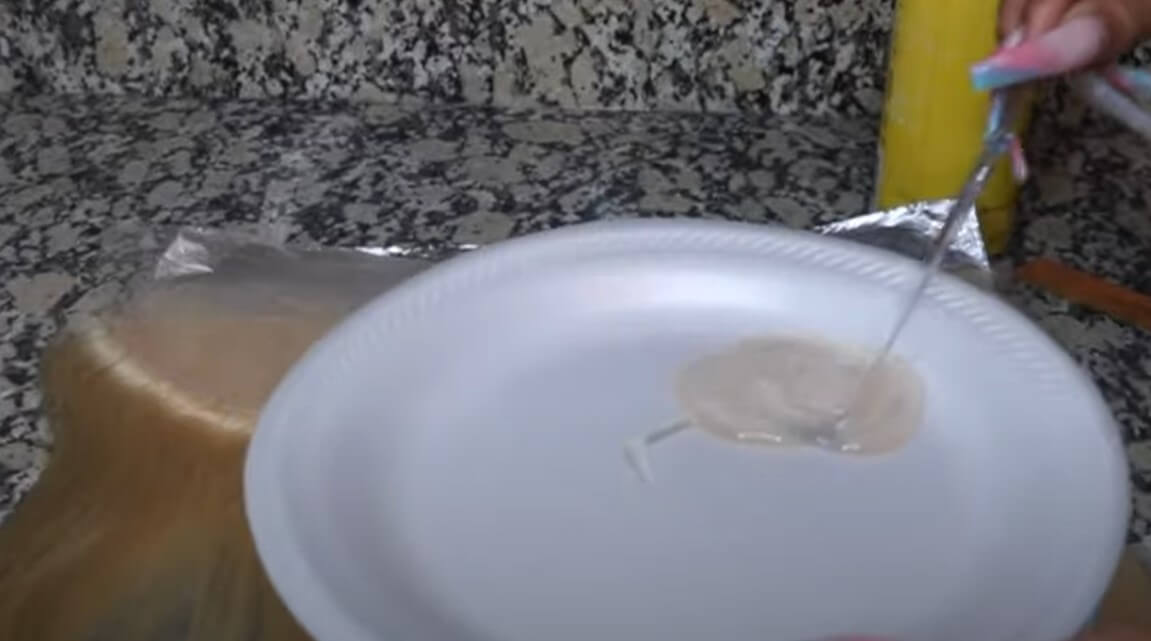
For watercolor: Dispense a generous amount of piping hot water into a plastic tub and then add a few drops/globs of semi-permanent dye. The more you add, the richer your color result will be. Mix with a long spoon until the color is completely dissolved in the water. Your watercolor is now ready to use.
Step 3: Apply the Dye
The way you’ll apply the dye depends on the method you choose.
To apply semi-permanent and permanent dye, you’ll do the following:
- Put the wig on a mannequin stand. Don’t turn it inside out.
- Secure the wig to the mannequin head using T-pins and detangle the wig once more if needed.
- Put on your gloves and begin applying the dye to the wig.
If you prefer, you can leave the wig on the mannequin head throughout the dye application step. If you do, take the following steps:
i. Section the wig into 4 to 6 equal sections.
ii. With gloved hands, apply the dye to the hair strands.
iii. Use a small brush to get the dye as close to the lace as possible without actually touching it. Though you have already taken steps to prevent lace stains, you should still try your best not to get the dye on the lace.
While Lots of people find it easier to apply the dye while the wig is lying flat. Here’s how to do it:
i. Put some newspaper down on a large table.
ii. Lay the wig flat on the table.
iii. With gloved hands and a tinting brush, begin painting on the dye. Be very thorough and cover every strand. Again, avoid the lace and wig cap. Carefully brush the color on with a toothbrush when you get to the hairs attached to the lace.
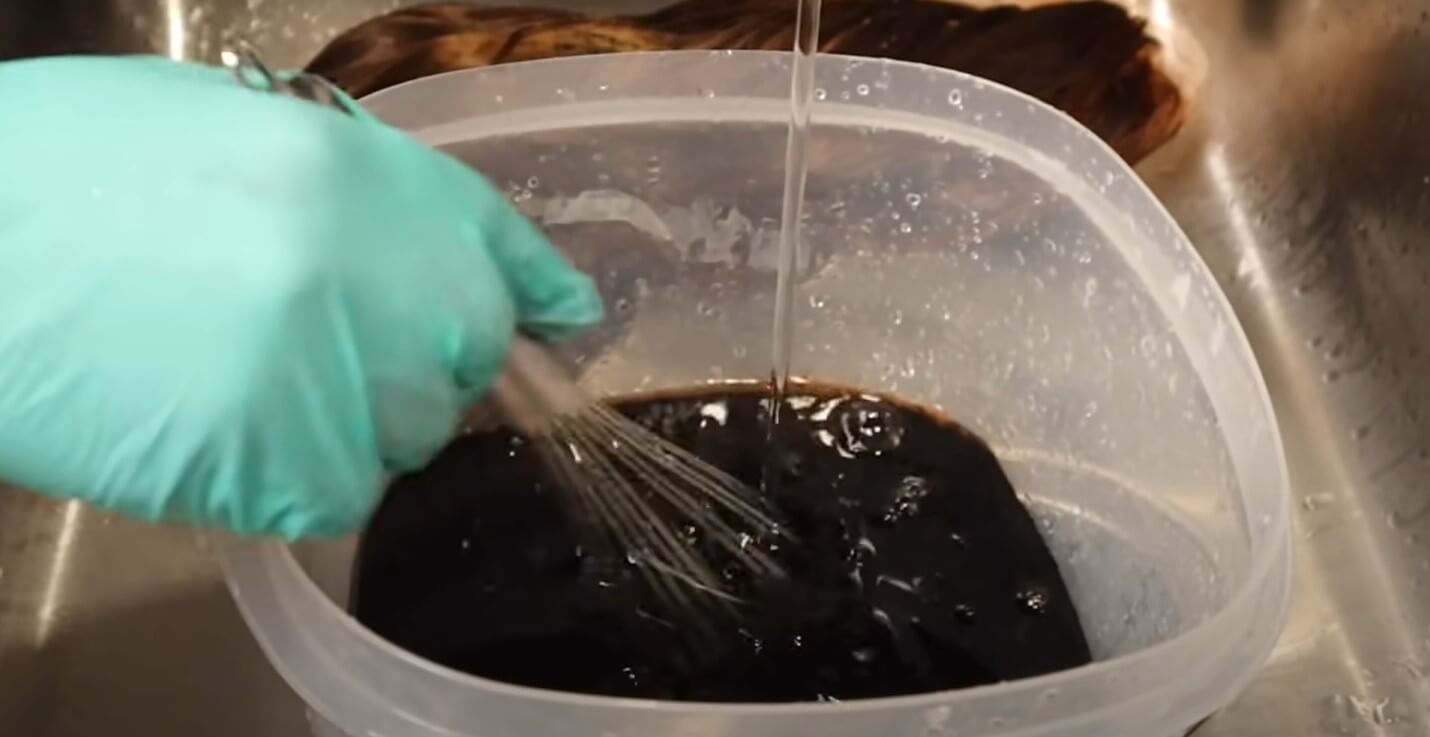
For watercolor: Dip the wig into the tub of colored water. Completely submerge the wig. Leave it in the water for a few minutes and swirl it around.
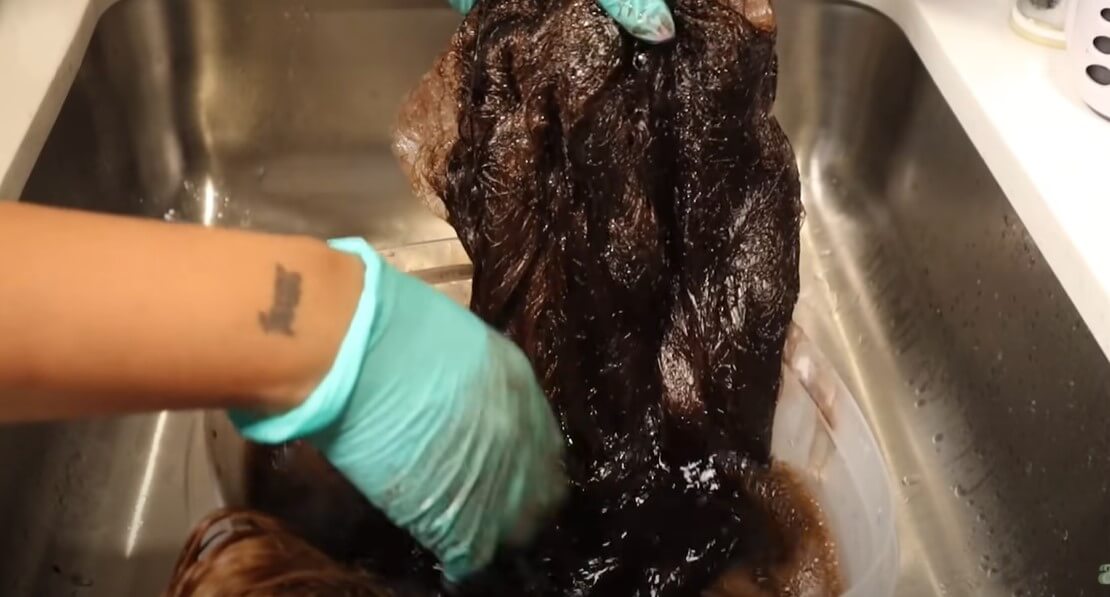
Step 4: Process and Then Rinse
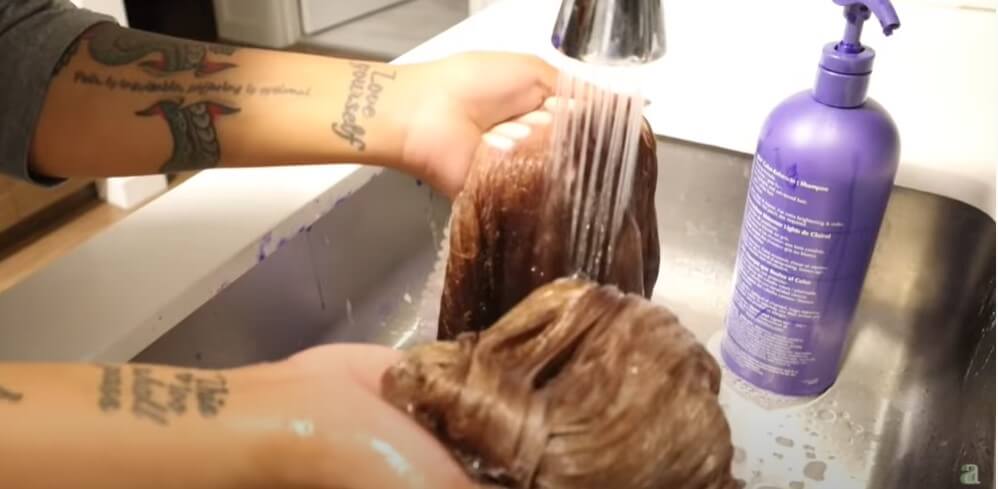
For semi-permanent and permanent dyes, you’ll need to wait a considerable amount of time for the color to process. On average, you’ll need to wait anywhere from 25 to 45 minutes, but take a peek at the dye instructions to be sure. Once time is up, rinse the wig thoroughly and follow up with a conditioning treatment (if included with the dye). You can also use your own wig conditioner that you use on a regular basis.
For watercolor: Lift the wig from the water every couple of minutes to see what the results look like. When you’ve achieved the results you want, remove the wig from the plastic tub.
Step 5: Dry the Wig
To dry the wig, begin by towel-drying it with a microfiber towel. Then air-dry it on a mannequin head or out in the open. If you’re short on time, you can blow dry it on “Cool.” Your wig is ready for the rest of the styling process
Takeaway
Learning how to dye a wig can be a daunting task, as there are so many things that can go wrong. But with this guide, you can confidently DIY your way to a new, fresh wig color!


Leave a comment