

How To Put On A Wig Cap
A well-fitting, snug wig cap is crucial to slaying any unit. It helps to flatten your natural hair and provide a smooth base for your unit, so you can enjoy a natural wig slay every time. Whether you’ve been skipping wig cap application or aren’t quite sure you’re applying your cap right, we can help. In this article, we’ll tell you exactly how to put on a wig cap.
Putting on a wig cap seems easy, but if you want a super laid result, you’ll need to do more than just throw the cap on and go. Here are some step-by-step instructions to put your wig cap on like a pro!
Get Your Materials
There’s nothing more frustrating than trying to put on your wig cap without the right supplies. So, do yourself a favor and pick up the below materials before you get started.
- Holding spray or hair gel
- Wig cap
- Blow dryer
- Scissors
Put on A Wig Cap: Step by Step
Once you’ve got your materials on hand, use the below instructions to get it applied right!
Step 1: Cornrow your hair to create a smooth, even foundation. Don’t make the braids too large or you’ll end up with a bulky result.
Step 2: Open up your wig cap and put it on your head.
Step 3: Gently stretch the cap downward until your hair and ears are fully coverd.
Step 4: Pull the wig cap down to your eyebrows. This may seem a little odd at first, but it creates tension, which will further flatten your natural hair.
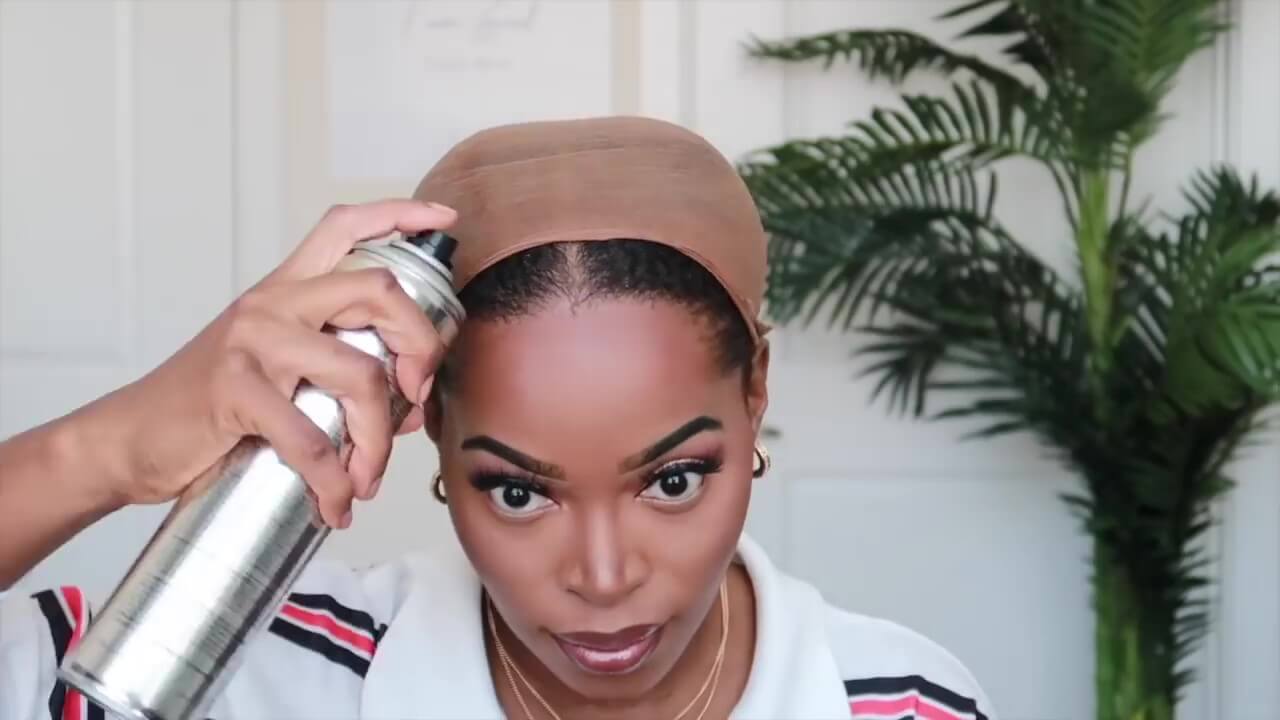
Step 5: Apply hair gel or holding spray around the perimeter of your hairline, from ear to ear. Got2b Glued Freeze Spray is a long-lasting adhesive spray that many wig wearers use for this purpose. Don’t worry about applying the product directly to the cap. It will sink in through the thin material. Be careful not to get the spray onto your hair.
Step 6: Dry the spray or gel with a blow dryer on cool. It may take a couple of minutes for the spray or gel to dry completely.
Step 7: Once the layer is dry, it’s time to free your ears. Right above your ear, pull the cap to create distance between the material and your skin.
Step 8: Cut a hole large enough to pull your ear through.
Step 9: Repeat the process with your other ear.
Step 10: Spray the holding spray around your hairline again. Pay extra attention to the area where your ear and the cap meet.
Step 11: Blow-dry the second layer on a “cool” setting until it’s 100% dry.
Step 12: Gently peel the cap back and carefully trim the excess material that’s not held down by gel. Start by cutting the cap vertically starting at the middle of your forehead and then make your way down each side cutting horizontally.
Step 13: When you get to your ears, cut straight from your hairline to the bottom of the ear hole.
Step 14: Trim the excess material left over from the ear holes.
Step 15: You can apply and dry another layer of gel to smooth the cap’s edges or go straight into installing your wig.
Dos and Don’ts Of Putting On a Wig Cap
Putting on a wig cap seems easy, but if you’re not careful, many things can go wrong. To avoid a wig disaster, read the below dos and don’ts of putting on a wig cap:
Dos
- Do braid your natural hair as flat as you possibly can. If you don’t know how to braid, slick your hair back and secure it with bobby pins or elastic bands.
- Do take your time throughout the wig cap installation process. Rushing through can result in injury to your skin or hair. This especially applies to when you’re cutting the cap from around your ears.
Don’ts
- Don’t forget to stretch the wig cap down over your eyebrows before you begin adhering it to your head or cutting away any material. This will give you the flat, natural results you’re looking for.
- Don’t install your wig until your wig cap is 100% dry. Installing your wig while your cap is wet can lead to mold and mildew buildup under your wig.
How To Choose A Wig Cap
The wig cap you choose has a direct effect on your final results. That’s why we’d like to inform you of your wig cap choices and several factors to consider when selecting one.
Color
Choosing the right color wig cap is the first step in making your wig look natural. You should pick a wig cap that closely matches your skin color.
That way, whenever your wig cap shows (where your wig is parted), it won't make your wig look unnatural. If you can’t find a cap that matches your skin choose one that’s as close as possible to it. You can apply some powdered foundation to the cap in a shade identical to your skin tone.
Material and Construction
When deciding on a wig cap, you should pay extra attention to its material. Here are some wig cap materials you’ll see when you go shopping:
Nylon - Nylon provides a secure grip and won’t dry your hair out. This material is standard when it comes to prepping your hair for wig installation.
Cotton - Cotton wig caps are cheap and easy to work with but can suck the moisture from your strands and cause breakage.
Netted Caps – Netted caps have large holes that make them much more breathable than other caps.
Silicone or Silk - Specialty wig caps made from silicone or silk are less practical but much more protective than other wig caps. These come in handy for women who have little or no hair and a sensitive scalp.
Pros And Cons Of Wearing A Wig Cap
Now it’s time to go over the pros and cons of wearing a wig cap underneath your wig. Use the information included in this section to help you decide if a wig cap is right for you.
Pros
- They create a flat base for the wig - A well-fitting wig cap smooths out the lumps and bumps of your cornrows. Furthermore, they make the wig sit flat against your head, making it look more natural.
- Wig caps help keep your wig clean - Wig caps create a barrier between your wig and the oils, sweat, and products that build up on your head throughout the day. They absorb these byproducts and help keep the inside of your wig clean, so you won't have to wash it as often. This is a great benefit, being that wigs are expensive, and washing them too often will leave them in tatters.
- They hold your wig in place - Wig caps help to prevent your wig from slipping off. This is extremely helpful for anyone with little to no hair, as it gives your wig something to grasp, aside from your skin.
- The right wig cap will make your wig more comfortable - Wigs can feel scratchy and irritate sensitive skin. Wig caps give you an extra layer of comfort that protects your hair and scalp against the rough material of your wig.
Cons
- They can make you hot - Wig caps contribute to overheating, which can make you sweat or cause rashes to break out on your scalp. If you’re already prone to overheating, choose a wig cap made from a breathable material.
- Some materials can damage your hair or scalp - Some wig caps are made from materials that can damage your hair or scalp. This is especially true for anyone with little or no hair. If you have a sensitive scalp or dry hair, choose a gentle material like silk or nylon.
- Wig caps can be uncomfortable - While your wig cap shouldn’t be too tight, it should fit snugly to keep everything in place. The extra pressure could be painful for some women. If your wig cap is too snug, try getting a larger size or switching to one made from a stretchier material.
The wig cap application method we’ve presented to you takes some time and effort, but it’s sure to give you a seamless, natural-looking wig installation. With the information in this article, you’ve got all you need to choose the right wig cap and apply it correctly. Now you’re ready to move onto the next step - wig installation. Good luck!


Hello Betty, if you finally decide to try some wigs, don’t put too much pressure on yourself to find the “perfect” wig right away. Experiment, have fun, and see it as a way to explore your personal style and boost your image! Start with a budget-friendly option to get the feel for different styles, textures and colors is our best advice for beginners. Hope this can help.
Was thinking about trying this myself, the information has been very very helpful. Still undecided.
Leave a comment