

How to Put on a Wig - Step by Step Beginner's Guide

Wearing a wig is a great way to experiment with different haircuts, styles, and colors without damaging your natural hair. But, putting on a wig as a beginner can be intimidating. This is your ultimate guide to learning how to put on a wig as a beginner, with simple step-by-step instructions. After reading this guide, you’ll have all the information you need to wear a wig with confidence.
Choose the Best Wig for You
No matter how well you can prep and apply a wig, if the wig is not a good fit for you, you won’t get the result you desire. So, the first step is to choose the best wig for you. There are three things to consider when selecting a wig.
Wig Style
First, you must determine your preferred style, including the hair texture, length, and cut. With so many wig styles available, from short and curly to long and straight, or anything in between, you won’t have any trouble finding a wig that matches your personal style, face shape, and budget.
Hair Quality
Next, you’ll need to decide whether you want a wig made of synthetic hair or human hair. Synthetic hair wigs cost much less than human hair wigs, as synthetic hair doesn’t last as long or look as natural as human hair. On the other hand, human hair wigs are long-lasting and look incredibly natural - as natural as the hair growing from your scalp.
Cap Construction
Another important thing to consider when choosing a wig is its cap design. The cap design, to a great extent, determine how you put on a wig. There are three popular types of wig caps on the market.
Lace Front Wigs
Lace front wigs are likely the best option for beginners who are new to wearing a wig because they look the most natural with the least effort. This type of wig contains a sheer lace front that gives the appearance of a natural hairline. It is also the ideal option for individuals experiencing hair loss along their front hairline. Learn how to wear a lace front wig
Full Lace Wigs

As the name suggests, full lace wigs have a cap made entirely of lace. Some individuals prefer this type of wig because you can part it absolutely anywhere. This means you can do high and low ponytails, side braids, pig tails, or any other style you desire. You can treat a full lace wig like it’s your own head of hair.
360 Lace Wigs

360 lace wigs are similar to lace front wigs, except the lace continues around the entire perimeter of the wig. This gives you a natural hairline at the front and back of your wig.
With a 360 lace wig, you can part your hair wherever the lace is, which makes this cap type perfect for high ponytails, low ponytails, and even a side braid.
Video Guide on How to Put on a Wig
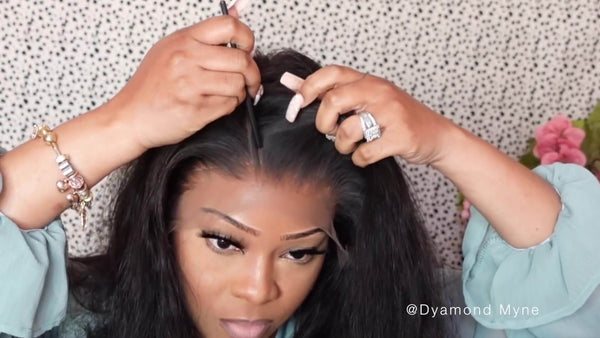
In this video, Dyamond Myne shared the celebrity hairstylist secrets and showed you how to use our Undetectable Skin Melt Lace Front Human Hair Wig [LFW11] to melt the lace like a pro for beginners.
Wig Install From Start To Finish: In this video Guide, Arnell Armon use the same wig as Dyamond Myne to share her Bald Cap Methord wig install from start to finish.
Products and Tools You Need
- Wig cap that matches your skin tone
- Wig glue, such as Gorilla Snot or Got2B
- Hair gel
- Makeup powder that matches your skin tone
- Rattail comb
- Wide-tooth comb
- Curling wand or hair straightener
- Bleach powder
- Developer
You can find all of these supplies at online shops, large department stores, or your local beauty supply store.
Bleach the Knots
Bleaching the knots of your wigs means bleaching the places where the hair is sewn into the wig. You may want to bleach the knots on a wig because when these knots are visible, it can make the wig look less natural. Some wigs have double knots, which are more visible, less natural-looking, and more difficult to bleach. The most natural-looking wigs have single knots and will be the easiest to bleach.
Bleaching the knots is optional, as some high-quality wigs come with pre-bleached knots.
To bleach the knots on your wig, mix the bleach powder and developer per the package instructions and apply it to knots on the inside of the wig. Allow the bleach to sit for about 15-20 minutes and repeat if needed. If the knots look brassy orange, you can apply purple shampoo to the lace afterward.
Prepare Your Hair by Making it Flat

Once your wig has been prepped, it’s time to prepare your natural hair to be put under a wig. Your hair should be as smooth and flat as possible underneath the wig so that your wig will lay flat on your head and appear natural.
If your hair is short: Part it in the middle or on the side (depending on where your wig will be parted) and comb or brush your hair backward.

For long hair: You can do one of two things:
- Part several sections from front to back, do several small cornrows, and then pin the ends flat against your head with bobby pins.

- Alternatively, comb your hair around the perimeter of your head so that it is flat and then use bobby pins to keep your hair in place.

Put on Your Wig Cap

Putting on a wig cap is an optional step for some wig constructions, but wig caps are highly recommended as they will provide structure and a good foundation for your wig to sit on. They also to keep the wig on your head all day.
However, some individuals find that wig caps feel too tight on their head and even cause headaches. If you experience this, it may be better to go without a wig cap.
Wig caps are available in nylon or mesh materials. Mesh is a cooler and more comfortable option.
Once your hair and been flattened and pinned down, then put a wig cap over your hair to further secure it in place. To do this, stretch the wig cap over your hair, and tuck in any stray hairs. Then, cut the wig cap down to just in front of your natural hairline. You can apply some gel or hair glue to secure the wig cap.
Matching the Wig Cap to Your Skin Tone
If the color of your wig cap doesn’t match your skin tone, you can remedy this by applying powder or concealer to the wig cap. Be sure that the makeup matches the color of your skin.
Apply the makeup to your wig cap in the spot where you plan to part your wig.
Apply Your Wig to Your Head

Once your wig and hair are ready, it’s time to put on your wig!
- Bring the front of your wig to your hairline and pull the rest of the wig over the back of your head.
- Adjust the ear tabs and ensure that they lie flat against your head to hide your hair and hairline underneath the wig.
- If the wig seems too tight or too loose, adjust the straps to give your wig a snug and secure fit. Be careful not to make the wig too tight, as this will become uncomfortable after a while and even cause a headache.
Create Your Part
Your wig may come pre-parted, but it may not be natural or fit your preferred hairstyle. To change your part, you should first determine where you want to move the part. The location you choose will depend on the cut and style of the wig and where you usually wear your part. Choose a middle part, side part, or off-center part.
When a wig already comes with a part, a new part will not easily stay in place. There are several options for moving the part:
Option 1: Part the hair, and then gently smooth either side down with a curling wand or the outside of a flat iron to help it stay in place.
Option 2: Part the hair, pin the two sides down with an alligator clip, and spritz the hair with a small amount of water. If needed, apply a small amount of product such as mousse or gel to help the hair stay in place. Remove the clips when the hair is dry.
Glue Down/Secure Your Wig

To help your wig stay securely in place and to create a more natural hairline, you can use wig glue. Apply a small amount of wig glue to your natural hairline underneath the wig and also to the hairline of the wig. You can also use products such as wig tape or wig clips for more security.
Cut the Lace

If it is your first time wearing your wig, you will need to cut away all of the extra lace. Don’t forget to cut off the ear tabs on each side of the wig.
You can use your regular every-day scissors or nail scissors for more precision – don’t use dull scissors, as they can damage the lace. Take your time throughout the process to ensure that you don’t cut off too much lace.
Check out this article for detailed instructions on how to cut the lace on your wig.
Melt Down the Lace
If the lace along the hairline of your wig is not natural-looking, then you can melt the lace along the hairline of your wig. To do this, apply a product such as hair glue or gel to the hairline and then blow dry it. This will get the lace to lay flat and blend in with your skin.
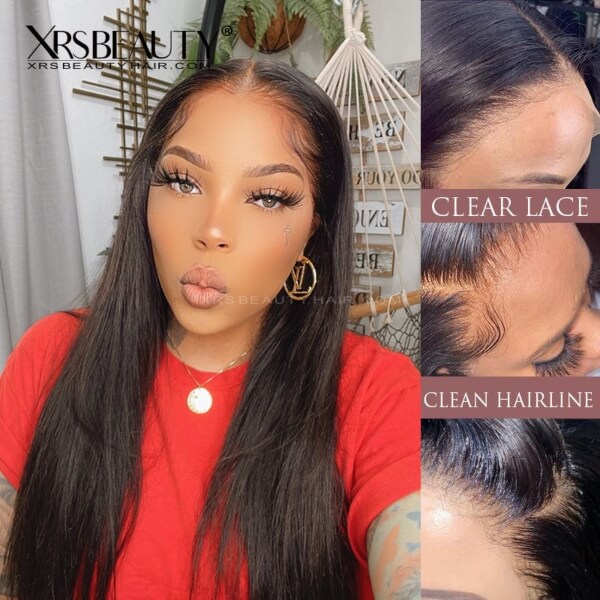
If you want an effortlessly natural look without too many extra steps, check out our 13x6 new clear lace wigs or our 13x5 layed edge lace wigs for a beautiful, natural-looking result.

Clean Up Your Wig
If you did not do this earlier, pluck the hairline to remove any obvious knots and make it look more natural. Some wigs come with a natural-looking hairline while others don’t. If yours comes too close to your eyebrows or has an odd shape, pluck the wig as needed. Our Clean Hairline wigs come with a soft, natural hairline that won’t need any plucking.
Add Powder to Make Your Wig Look Natural
To make your wig look even more natural, you can add more powder along your hairline and part. Doing so will make your wig hairline even more undetectable.
Style the Wig

The most fun part about wigs is the ability to try out different hairstyles, so be sure to experiment with styling your wig in various ways and changing up the part to discover styles that you’ll love!
If you want ultimate styling versatility, choose a high-quality virgin hair wig that will look natural no matter how you decide to style it.
Conclusion
There you have it - a complete guide with all the tips and tricks for how to put on and wear a wig! If you’re a beginner, remember to have patience and take your time to properly prepare and apply your wig, as this will help you avoid wig damage and create the most natural look possible.
Wigs are a fun and versatile styling option to define your look, so we encourage you to take advantage of this opportunity to experiment and express your individuality with a hot new look. Enjoy!


Hi! Looking for 100-110 density in hd melted frontal glueless straight or wavy that can be flatiron.
Mary Hi Mary, any questions you have about our wigs, please send an email to servciexrsbeautyhair.com. Our service team will answer any quesitons you may have. Thank you
Questions about your wigs
Leave a comment