

How to Glue a Lace Front Wig
Take a moment to picture this scenario - you’ve fallen in love with a beautiful lace front wig and it arrives in perfect condition. Trying to save yourself some money, you decide to install your own unit. You’re met with disappointment and frustration as you struggle with your chosen wig glue, applying too little or too much and ultimately ruining your expensive lace.
As a wig wearer, you know that the secret to a long-lasting fit that will stay put through the sweatiest of workout sessions lies in just how well you glue your lace wig down. You also know that for an undetectable blend, your wig has to be glued down properly for an invisible finish. With your wig glued down just right, even professionals will not be able to tell where your wig begins and ends!
By knowing exactly how to lay your wig, the application can be simple and give you the same flawless results every time. Get comfortable and take a look at this detailed guide on exactly how to glue a lace front wig.
- Step 1: Wash Your Natural Hair
- Step 2: Clean Your Forehead
- Step 3: Make Your Natural Hair Flat
- Step 4: Put Your Lace Front Wig on Your Head
- Step 5: Apply Wig Glue Before Your Hairline
- Step 6: Seal Your Hairline
- Step 7: Cut the Excess Lace Off
- Step 8: Clean Excess Glue
- Step 9: Melt & Style
Tools and Products Needed to Glue a Lace Front Wig
Gather this list of products that you will need to glue your wig down before you begin and save yourself time during install:
- Got2B Glued Blasting Freeze Spray, Holding Spray, or Edge Control
- Edge Control Brush
- Wig Cap
- Wig Glue
- Rattail Comb
- Plastic Eyebrow Razor or Small Sharp Scissors
- Isopropyl (Rubbing) Alcohol
- Q-Tips
- Satin Scarf
- Blow Dryer
How to Glue Your Lace Front Wig: Step by Step
Step 1: Wash Your Natural Hair
Since you'll be wearing your lace wig for a while, the first step is to make sure that your natural hair is clean. Wash and condition your hair as you normally would. Be sure to nourish your hair with a hydrating oil of some sort to avoid dry, itchy scalp. Once your hair is dry and moisturized, if your hair is long enough, add 7 or 8 cornrow braids that flow from the front to the back of your head.
Step 2: Clean Your Forehead
Next, in order for the wig adhesive to dry and stick the way you need it to, your skin has to be clean. Wash your face right before install - especially your forehead - to get rid of any excess oils or moisturizers.
Step 3: Make Your Natural Hair Flat
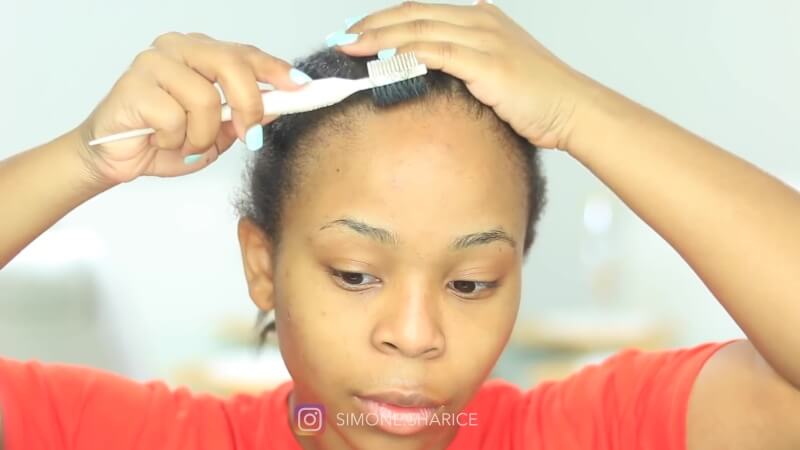
Once your natural hair is washed and braided, and your skin is clean, apply either your Got2B Glued Freeze Blasting Spray, your choice of holding spray, or edge control to slick your hair back. (If your braids are fresh and neat enough, you can skip this step.) Now, you’ll use your edge control brush along the hairline area to simply smooth back any flyaway hairs left behind. Lastly, apply your wig cap without covering where you want your hairline to be.
Step 4: Put Your Lace Front Wig on Your Head

Now that your hair and skin are ready, next you want to go ahead and put your wig on. Line it up exactly the way you want to wear it. Once you are pleased with the position of your lace wig, fold the excess lace on the front of the wig back so that it touches the hair on your unit and leaves your real hairline exposed.
Now, line it up exactly the way you want to wear it. Once you are pleased with the position of your lace wig, fold the excess lace on the front of the wig back so that it touches the hair on your unit and leaves your real hairline exposed.
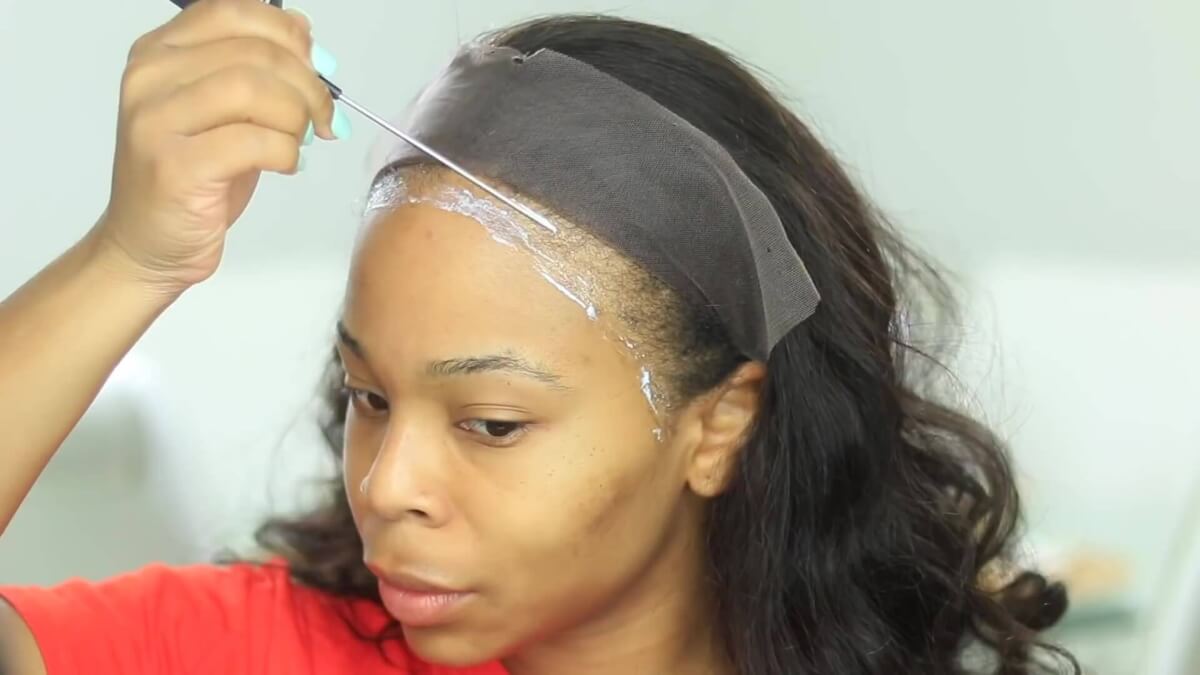
Step 5: Apply Wig Glue Before Your Hairline
Now, you want to measure about a ½ inch to 1 inch away from your hairline on your forehead. This is where you want to put your lace wig glue to keep from tangling and damaging your edges. Apply a minimal amount of glue for the first thin layer by making a trail of small, pin-sized dots along the application line. (With glue, less is always more!) Then, you need to use the tail of your rattail comb to flatten the glue. Smooth it back, but DO NOT put the glue on your edges. (Make sure that the glue dries clear before applying another layer!)
Pro Tip: If you’re a beginner, apply the glue in sections so you can work slowly. Start with the middle of your forehead and press down your lace when the glue is ready. Repeat this process with both the left and right sides.
For a sturdy fit, apply two layers. If you are highly active, deal with lots of humidity, or love having fun in the water, you want to apply three layers. Be sure to wipe the end of your comb off before the application of each new layer.
Step 6: Seal Your Hairline
With your glue tacky, clear, and ready to go, the next step is to seal the deal. Grab the lace that you folded back and bring it back forward. Now, you want to match the hairline of your wig with the line of wig adhesive. (Once you’ve lined it up, try to avoid pulling the wig back up.)
Clean your rattail comb again and use the end to press the wig hairline down onto the glue. Hold the lace as you press the wig down onto your skin. Use the back of the comb for the final pressdown.
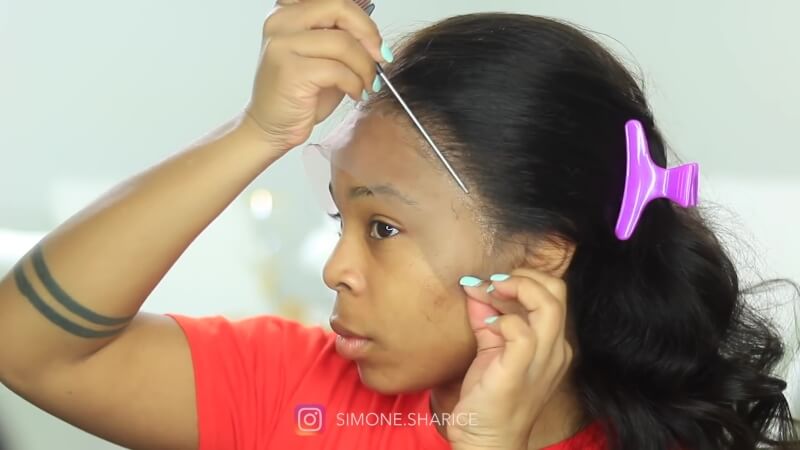
Step 7: Cut the Excess Lace Off
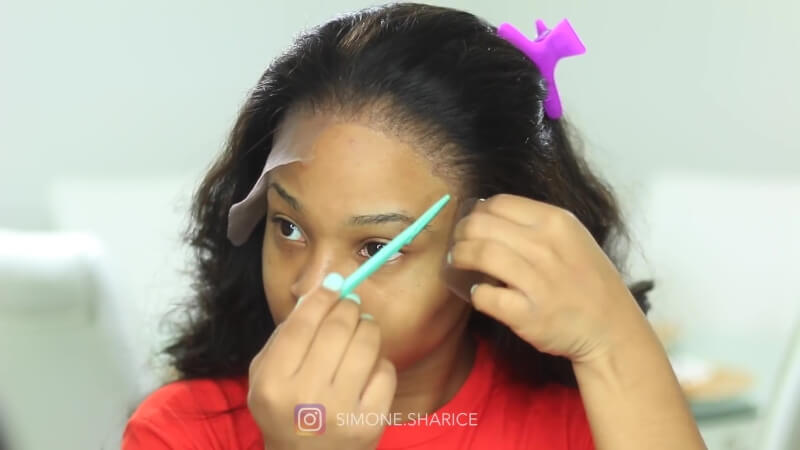
Here’s one of the most important steps - it’s lace cutting time! (Of course, if your wig lace is already cut down to the hairline, you will skip this step.) Using your plastic eyebrow razor or small sharp scissors, start at the middle of your forehead, cutting the lace in half diagonally. (In other words, bring the cutting utensil towards your hairline in a forward motion.)
Pro Tip: If you are using the plastic eyebrow razor, be sure to face the sharp side away from your face to avoid cutting your skin.
Now, you want to begin cutting the lace off. Make sure that you leave about 3 mm (around ⅛ inch) of lace uncut. Carefully trim off the extra lace along the desired hairline. Don’t forget to cut any excess lace left beside the ears!
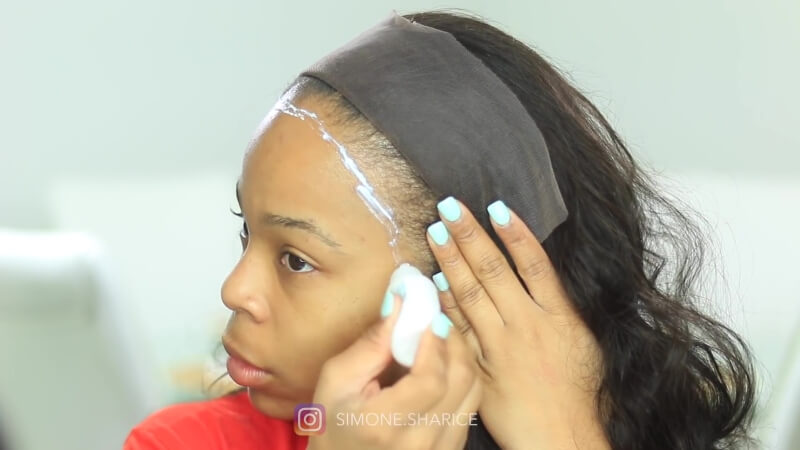
Step 8: Clean Excess Glue
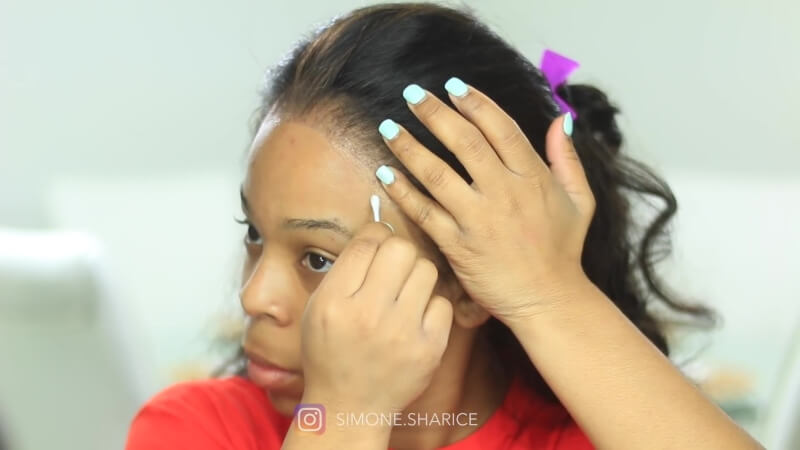
If you have any excess glue left behind, using a dabbing motion, use a Q-Tip and Isopropyl alcohol to gently clean the residue from in front of your hairline. Remember that your glue might go on white, but should dry clear. If you happen to see white film or residue, you need to clean it off. Try to get as close as possible to your hairline without getting alcohol on your lace wig.
Remember NOT to touch your lace directly, or you’ll be removing the glue from the wig - you definitely don’t want your wig lifting if you’ve finally got it glued down successfully! Keep from having to glue your wig back down by wiping off any extra glue softly and carefully.
Step 9: Melt & Style
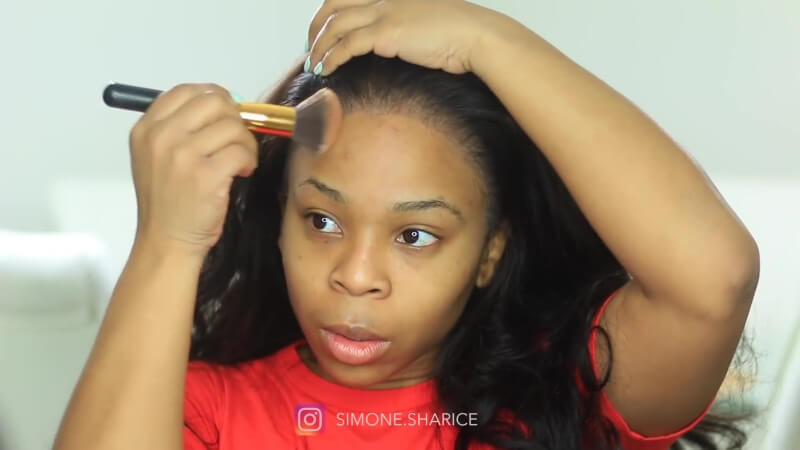
If you’ve made it this far, pat yourself on the back - the final step is to melt your lace for that professional, undetectable finish!
Here is where you will use your makeup brush and makeup powder - apply sparingly along the lace until it matches the tone of your skin.
Using the back of your rattail comb again, press the lace down until it disappears into your skin. Fix your baby hairs and edges if you wish by spraying your edge control brush with your Got2b glue spray or edge control and styling them. (No worries, the spray will not harden your brush contrary to popular belief.) There you have it - you’re all set!
Pro Tip: For the ultimate finish, before styling your edges or baby hairs, wrap your hairline using a satin scarf. Then, blow dry until perfectly sealed.
Why It Is Important to Glue Your Lace Wig Down the Right Way
If you ask your favorite celebrity hairstylist why they put so much emphasis on the perfect glue down technique, you’ll probably be able to write a book with the endless list of reasons! Here are a few of the standout reasons why you need to pay close attention to the way you glue down your wig.
For the Perfect Melt
When your wig is sealed, you want to be sure that the hairline of your wig blends in perfectly with your scalp. Even the most expensive of wigs will be noticeable if your lace is not properly melted. If you want to be sure that nobody can tell where your meltdown begins at the edge of the wig, applying glue correctly is a key component. Gluing your wig down without a plan can result in a visible or lifted hairline.
For a Natural-Looking Hairline
Speaking of lifted hairlines, this is one of the easiest ways for others to tell you are wearing a wig. Of course, hairline density is important for a natural look, but proper adhesive application is next on the list. If you want a believable hairline, the right glue down technique is essential. After all, the last thing you want is for the front of your wig to lift and blow in the wind like a toupee!
For a Long-Lasting, Secure Fit
Simply put, the better you glue down your wig, the longer you will be able to wear it without it budging. Premium quality lace front wigs are designed for long term wear, and quite naturally you’ll want to get more bang for your buck. To wear your wig for months on end without fear of premature lifting, you want to be sure your gluing methods are effective.
For the Protection of Your Edges
Carelessly gluing down your lace wig can have adverse effects. The improper technique can cause flaky and irritated skin, blocked pores, itchy scalp, and even the breakage of your edges. (If you have sensitive skin, you want to be especially mindful of your choice of glue.) The lace wig actually serves as a great way to protect your edges when your glue down is just right. To ensure that your edges stay intact after you take your wig off, later you will read how to apply the glue to the area of skin that sits right in front of your edges on your forehead.
Tips for Applying Wig Glue without Damaging Your Edges
Here are a few tips for keeping your edges safe and sound as you glue down your new lace wig:
- Always moisturize your edges first to avoid dry, brittle hair and breakage.
- Be sure to smooth your edges down to avoid stray pieces of hair getting caught in the glue.
Pro Tip: Use an edge control for extra nourishment.
- Use your wig cap to protect your edges by covering your real hairline fully.
- Remember when applying wig glue, do not put it directly on your edges.
- When removing your lace wig, do so slowly and carefully with wig adhesive remover or alcohol to avoid tugging at your real hair.
The Key Takeaway
A little preparation, the right tools, and by following the proper procedure, will have you on the go with your natural-looking, freshly installed unit in no time! With clean skin and the perfect glue down method at your disposal, sealing your wig has never been easier. For premium quality, 100% Virgin tresses that are soft, supple, highly reviewed, and alluringly luxurious, have a look at our unbeatable selection of human hair lace front wigs at XRS Beauty!


Am glad I learnt something from this. Thank you!🙏
Leave a comment