

6 Different Ways to Style a Lace Front Wig
Wigs are one of the best accessories to show off your personal style. While many lace front wigs come ready-to-wear in basic styles, there are endless possibilities when it comes to styling your wigs and expressing yourself. Keep reading to learn how to get creative and effortlessly achieve stunning hairstyles with your lace front wigs!
Our #1 Rule When Styling a Lace Front Wig
You should never expose the wefted part of a lace front wig when styling. While the wefts used in lace front wigs can provide more volume, it’s important to remember that the lace hairline does not continue all the way around the wig. Be careful not to expose the wefts when styling to maintain a natural look.
Different Ways to Style a Lace Front Wig
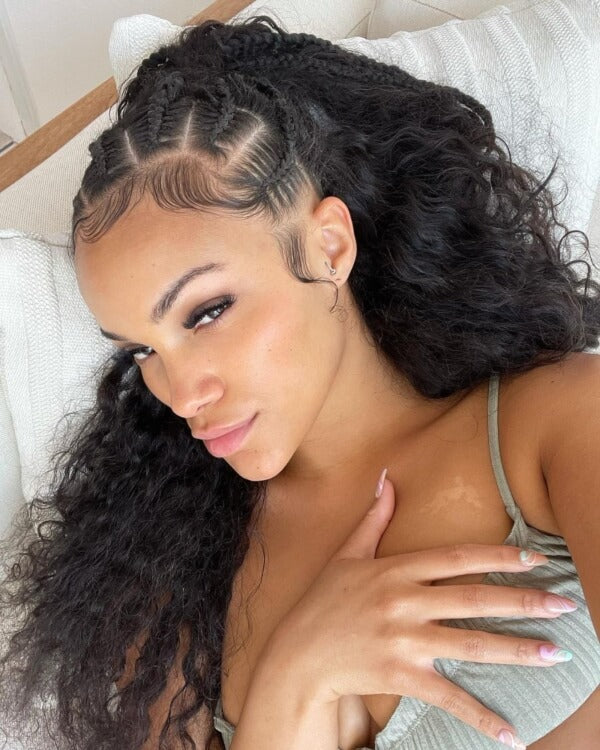
1. Braids
Braids are a classic choice when you want to add a little detail to your hairstyle. Braids have the power to make your hairstyle look intricate and complex, but many braided styles can be achieved in very little time!
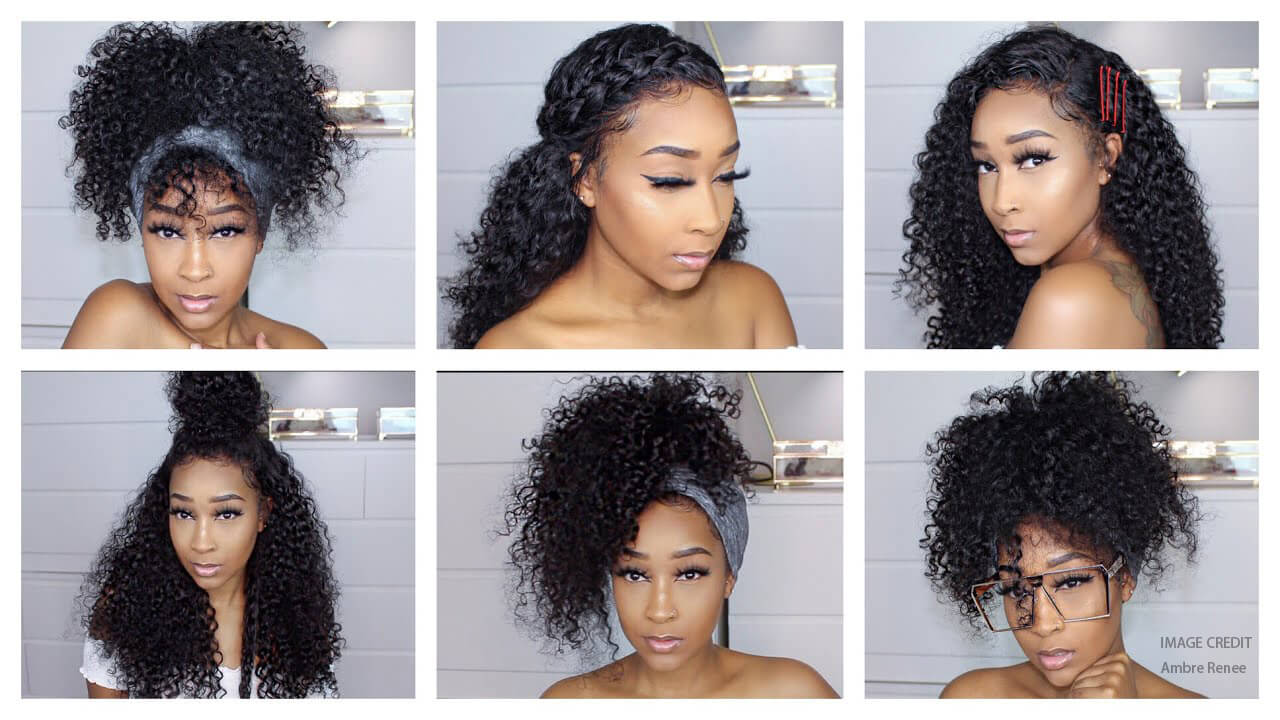
Half-Up Braided Look
Try out one of our favorite trends by adding a half-up braided look to your lace-front wig. Even using a lace front wig’s smaller parting area, this style will look flawless every time!
Tools and products for half-up braided look:
- Rattail comb
- Small rubber bands
- Hair ties
- Bobby pins
- Heat styling tools of your choice
- Styling products of your choice
To achieve this look, follow the steps below:
- Using a rat-tail comb, create two small parts about ½ inch apart at the top of the wig. This will create your first section to braid.
- Dutch braid the section until you reach approximately halfway to the crown of your head, or until you reach the end of the parting area on your wig. Secure with a small rubber band.
- Repeat with another braid directly to the left of the first braid, and then again on the right. Secure these braids with small rubber bands.
- Continue to add more braids until you achieve your desired look.
Gather the ends of all of the braids into a ponytail at the crown of your head. - Wrap a small section of hair around the ponytail to hide your ponytail holder. Secure with a bobby pin.
- Add a small amount of hair oil to your wig to make it shine! (optional)
Low Braid
We are obsessed with this sleek low braid look! Here’s how to achieve it.
Tools and products for low braid:
- Braiding hair extension
- Comb
- Hair gel
- Hair ties
- Bobby pins
- Hair shears
To achieve this look, follow the steps below:
- Comb the hair tightly back into a low ponytail. Add a bit of hair gel as you comb to smooth the hair and make it shine.
- Secure the hair at the nape of your neck with a hair tie.
- At this point, you can use an elastic to add braiding hair to your ponytail. This will allow you to achieve a longer braided style with a shorter wig.
- Separate a small section of hair from the ponytail or braiding hair to wrap around the hair tie later.
- Braid the ponytail, securing with a hair tie or clip when you reach the end.
- Hide the hair tie at the base of your braid using the separated section of hair from step 5. Secure it with bobby pins.
- If you added braiding hair, trim the ends with hair shears to clean up the look.
Halo Braid
The halo braid is truly a heavenly look. The combination of a detailed braid and perfectly styled baby hairs will frame your face beautifully. This gorgeous style is simple to achieve with a little bit of practice. It is perfect for a special event or a night out!
Tools and products for halo braid:
- Rattail comb
- Hair ties
- Bobby pins
To achieve this look, follow the steps below:
- Create a part that runs from one ear to the other, parallel to the front hairline. This will separate the section that you will braid.
- Pull the rest of the hair into a ponytail.
- Next to either ear, separate 3 sections of hair. This is where you will start your braid.
- Begin to dutch braid the hair by adding in sections as you go.
- Continue the french braid across your front hairline until all hair has been incorporated into the braid and you have reached the other ear.
- Continue a regular braid long enough to wrap it the back of your head.
- Let the rest of the hair down from the ponytail and style it.
- Pin the end of the braid underneath the hair at the back of your head.
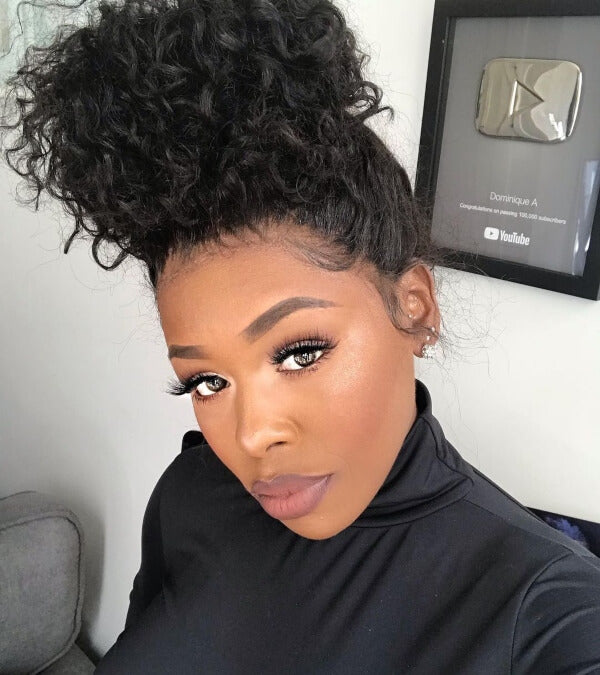
2. Bun
One of the most effortless looks that always stand the test of time is the hair bun. There are so many ways to incorporate buns when styling your lace front wig. Keep reading to find out how easy and gorgeous these bun styles are!
Messy Bun
Possibly the most iconic bun look is the messy bun. Because the rear hairline of a lace front wig does not contain lace and will show the wig’s wefts, this is not the most ideal style for a lace front wig. However, you can use hair accessories, such as a hair scarf to hide the back of your wig and achieve a natural look.
Tools and products for messy bun:
- Hair ties
- Bobby pins
- A comb of your choice
- Hair gel
- Toothbrush
- Hair scarf (optional)
To achieve this look, follow the steps below:
- Apply a wig cap to your natural hair, leaving out a section of hair along your back hairline. Style this section using heat tools to match the texture of the wig that you will be wearing.
- Install your wig using hair gel, leaving out the back section of your natural hair.
- Using a comb, gather the hair into a high ponytail. Secure with a hair tie.
- Wrap your hair around the ponytail to create the bun, securing with another hair tie or bobby pins.
- Bring your natural hair up and over the back hairline of the wig and secure it in place with bobby pins.
- You can also loosen the hairs at the back of the wig slightly to help maintain a more natural look.
- Pull out pieces to frame the face and create a messy bun look.
Space Buns
Add a trendy twist to a bun style by adding some space buns to your wig! Will these half-up, half-down space buns be your new favorite way to style a lace front wig?
Tools and products for space buns:
- Comb
- Hair gel
- Bobby pins or hair ties
- Curling iron
To achieve this look, follow the steps below:
- Part your wig down the middle to the end of your wig’s parting area.
- Separate two face-framing pieces from the rest of your hair (optional).
- Part out a square section on the left side of your part, and pull it into a ponytail to the left of the crown of your head. For a sleek look, add hair gel when combing back the section.
- Twist the hair into a bun and secure with pins or a hair tie.
- Repeat on the right side.
Low Bun
Next in line behind the classic messy bun is the timeless low bun. This style is perfect for an everyday look or a night out, and you can spice it up with braids and hair jewelry, too.
Tools and products for low bun:
- Comb
- Hair gel
- Hair ties
- Bobby pins
- Toothbrush
To achieve this look, follow the steps below:
- Begin by separating a few facing framing pieces at the front of your hair (optional).
- Comb your hair back into a ponytail at the nape of your neck, taking care to cover the back hairline completely.
- For a sleek look, add a bit of hair gel as you comb the hair together. Secure the hair with a ponytail.
- Twist the hair into a bun. Secure with pins and/or a hair tie.
- Lay your baby hairs with hair gel and a toothbrush.
3. Ponytail
Ponytail styles are another classic and versatile option when looking to change up the style of your lace front wig. These ponytail styles are perfect for a lace frontal, as they hide the back hairline.
High Ponytail
Just like a bun, a ponytail is a classic and versatile style for a variety of occasions. However, it is not recommended for a lace front wig, as the wefts at the back of the wig may become exposed. However, consider using accessories like headbands and hair scarves to hide the rear hairline and maintain a more natural look.
Tools and products for high ponytail:
- Wig cap
- Heat tools
- Hair ties
- Bobby pins
- A comb of your choice
- Hair oil
- Hair gel
- Hair scarf (optional)
To achieve this look, follow the steps below:
- Apply a wig cap to your natural hair, leaving out a section of hair along your back hairline.
- Style this section using heat tools to match the texture of the wig that you will be wearing.
- Install your wig using hair glue, leaving out the back section of your natural hair.
- Using a comb, gather the hair into a high ponytail. Secure with a hair tie.
- Bring your natural hair up and over the back hairline of the wig and secure it in place with bobby pins. If your hair is long enough, incorporate it into the ponytail.
- To hide the hair tie of your ponytail, simply separate a small section of hair and wrap it around the ponytail. Secure with a bobby pin.
- Gently comb in a small amount of gel along your scalp, and apply a few drops of hair oil to the ponytail for a sleek and shining look!
Low Ponytail
A low ponytail is a classic, sophisticated look. It is perfect to wear to the office, an event, or a night out with friends. This style will only take a few minutes to achieve with a lace front wig!
Tools and products for low ponytail:
- Hair ties
- Bobby pins
- Hair gel
To achieve this look, follow the steps below:
- Begin by separating a few facing framing pieces at the front of your hair (optional).
- Comb your hair back into a ponytail at the nape of your neck, taking care to cover the back hairline completely.
- For a sleek look, add a bit of hair gel as you comb the hair together. Secure the hair with a ponytail.
- Separate a small section of hair and wrap it around the base of the ponytail to hide the hair tie.
Half-Up Ponytail

Half-up, half-down styles are so charming, and they'll add volume to your lace front wigs! The best part: this look only takes a few minutes to achieve.
Tools and products for half-up ponytail:
- Rattail comb
- Comb or brush
- Hair tie
- Bobby pin
- Curling iron or straightener (optional)
To achieve this look, follow the steps below:
- Begin by separating face-framing pieces from the rest of your hair (optional).
- Using a rattail comb, create a part from your temples to the crown of your head. Repeat this on both sides of your head.
- Gather the hair that you just parted into a ponytail at the crown of your head. Secure with a hair tie.
- Separate a strand of hair from the ponytail and wrap it around the hair tie. Secure with a bobby pin.
- Curl the hair for a voluminous look, or straighten it with a flat iron for a polished look!
4. Layered Cut
If your lace front wig is long and unstyled, its ends may not look their best. If your wig is in need of a trim, follow this easy DIY cut that anyone can do at home!
Tools and products for a layered cut:
- Hair straightener
- Curling iron
- Small rubber hair ties
- Haircutting scissors (do not use regular scissors)
Here’s how to give your lace front wig a beautiful layered cut at home:
- Straighten the hair using a straightener to prevent an uneven cut.
- Part your wig down the middle.
- Separate a medium-sized section of hair on either side of your face. Pull them together approximately two inches below your chin and secure them with a ponytail.
- Repeat with a second section from each side of your head, pulling to the front and securing them together with a hair tie approximately ½ inch below the first section.
- Repeat with 2 more sections, or until all of your hair is secured. Leave slightly more space between the third and last sections as compared to the rest.
- Remove the hair tie from the first section.
- Hold the hair of both sections between your index and middle finger, and then twist the section once. Switch hands after the twist if needed.
- Make small cuts in an upward, slightly jagged motion below your fingers until all of the hair has been trimmed. This technique prevents blunt ends.
- Repeat this process with the remaining three sections.
- Using your scissors, blend the layers by cutting in a downward diagonal motion until the ends and breaks between the sections no longer look jagged.
- Curl the hair for a beautiful finished result!
5. Wet Look
The wet look is a trendy way to style your lace wig, whether it’s added to loose curls to create waves, or added to a ponytail for a sleek and shiny finish. Below, we break down how you can transform a textured lace front wig with loose curls into a wet look beauty!
Tools and products for your wet look:
- Textured lace front wig
- Spray bottle with water
- Denman brush
- Hair oil
- Eco styler gel
To achieve this look, follow the steps below:
- Dampen the hair with a spray bottle.
- Detangle the wig with a Denman brush.
- Add a generous amount of hair oil to the hair. Work it through with your fingers to maintain the texture.
- Add eco styler gel on top of the oil. Work it through evenly.
- Scrunch your hair to add a little more volume.
- Finger coil front strands by twisting them around your index finger and then releasing them. This will add more definition to your face-framing pieces.
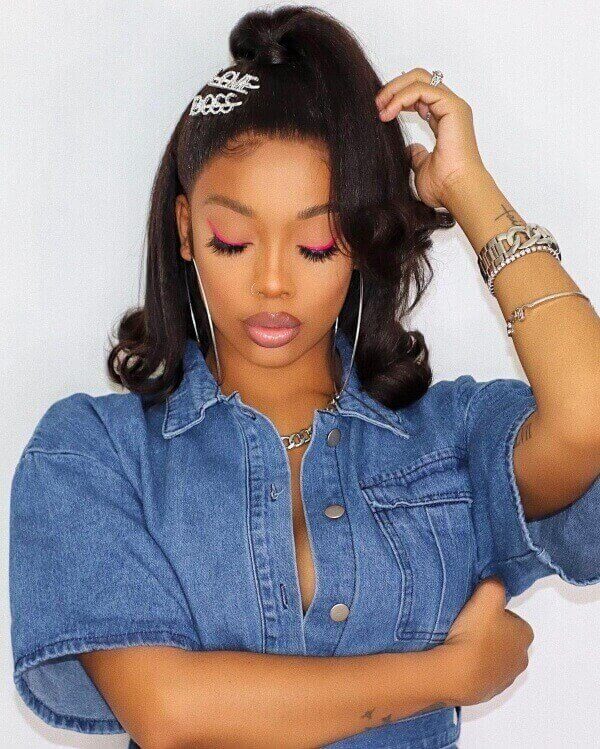
6. Accessorize
When in doubt, accessorize! Adding accessories to your lace front wig can take your look to the next level. Hair accessories can also be a useful tool to overcome some of the limitations of lace front wigs.
Headband

Headbands are a stylish way to dress up any look! They can be added to your hair when you’re on to go, or they’re the perfect accessory to complete an updo!
Scarf

Scarves are a stylish way to keep frizz at bay during a windy season. They are also a useful tool when you need to hide the wefts of your lace front wig.
Hair Jewelry
Add some bling to your wig by popping in some hair jewelry! Hair jewelry is stunning to add to braids, and can also level up a ponytail, bun, or half up half down style.
Conclusion
The possibilities are endless when it comes to styling your lace front wig! We hope that the basics we’ve provided will help you get started and inspire you to be creative when styling your wig!
What is your go-to routine? Do you simply wear your lace front wig how it comes, or do you like to try out different styles? Either way, share your beautiful photos to show off your look, and don’t forget to tag us on Instagram!


I wanted to express my appreciation for your informative article on styling lace front wigs. Your expertise shines through in the valuable tips and step-by-step instructions you’ve shared. It’s a fantastic resource for anyone looking to experiment with their lace front wigs. As a fellow wig enthusiast, I found your article incredibly helpful. In line with your focus on wig styles, I recently published a detailed guide on “Frontal Wig Styles” on our website, https://wepickbestforyou.com/frontal-wig-styles-a-detail-guide/
I believe your audience would find it beneficial, as it complements the ideas you’ve presented. Thank you for sharing your expertise and contributing to the wig community.
Hello Eve, thank you for your comments. Headbands could be a very nice accessories. By the way, did you order from the company you attached? I am not familar with this company, but it looks like they are doing good customized wigs.
Thanks for mentioning that headbands can be added to wigs to dress up a look. I’m thinking about getting a lace-front wig because I have some hair loss issues. I’ll have to speak with a stylist to see what kind of wig I’d look best in. https://www.highdefinitionhair.com/lace-wigs
Leave a comment